


Investing in a premium chilling unit removes the daily hassle of buying heavy bags of ice. You get freezing water on demand whenever your body needs it. This upgrades your daily recovery routine instantly and reliably. However, improper setup introduces serious risks to your hardware and property. Bad plumbing connections cause messy leaks, fast pump burnout, or even severe electrical hazards. You must build a secure, closed-loop system to stay completely safe. Poor electrical planning near water is highly dangerous. This guide offers a transparent, step-by-step walkthrough of a standard hardware layout. We detail exactly what you must do to achieve perfect water flow and complete safety. You will learn the reality of proper sealing, flow routing, and strict electrical standards. We emphasize careful, methodical assembly over risky quick-fix promises to protect your health.
Key Takeaways
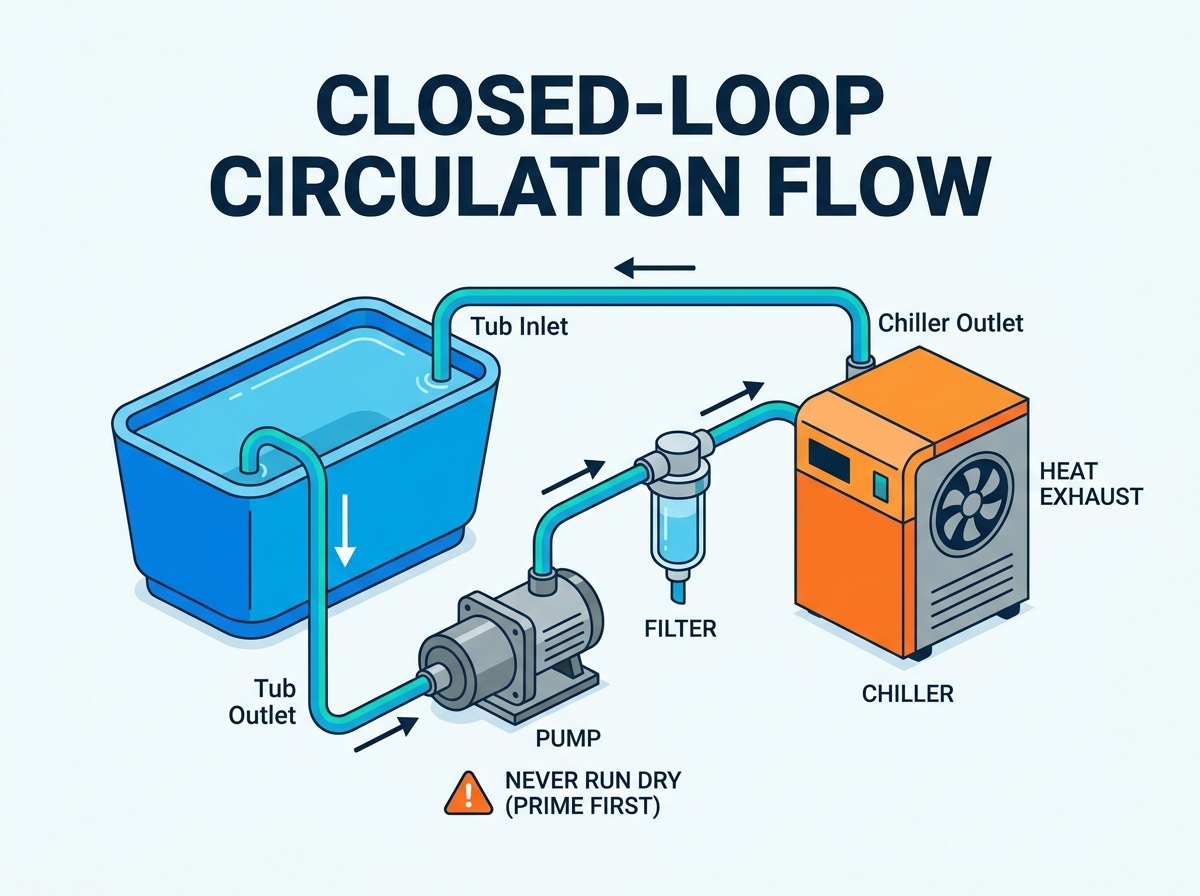
Always map your water circulation route before cutting or connecting hoses: Water flows from the tub, to the pump, through the chiller, and back to the tub.
Running a dry pump is the leading cause of hardware failure; manually priming the system to remove airlocks is a non-negotiable step.
Safe installation requires a dedicated GFCI outlet and a minimum clearance radius around the chiller for proper airflow and heat dissipation.
Evaluate your fittings during setup; standardizing on high-quality PVC or brass fittings with proper O-rings prevents micro-leaks.
Pre-Installation: Assessing Your Setup and Safety Requirements
Proper planning dictates the overall success of your plumbing project. Rushing into the physical assembly without evaluating your environment leads to costly mistakes. You must prepare your designated space and gather the correct materials beforehand.
Site Evaluation & Airflow
A well-ventilated space is strictly mandatory for any cooling machinery. Chillers do not magically eliminate heat from the liquid. They extract thermal energy from the water and exhaust it into the surrounding ambient air. Placing your unit flush against a wall traps this hot exhaust. It forces the internal condenser coils to recycle the same hot air continuously. This drastically reduces cooling efficiency. It also overheats the internal compressor and often voids manufacturer warranties immediately. We strongly recommend maintaining an 18-to-24-inch clearance radius around all exhaust fans. Keep the machine out of direct sunlight. Sun exposure forces the compressor to work twice as hard to reach your target temperature.
Electrical Compliance
Water and electricity form a deadly combination if handled improperly. Safe operation requires a dedicated Ground Fault Circuit Interrupter (GFCI) outlet. Standard wall outlets lack the necessary trip mechanisms to prevent electric shock during a water spill. Standard household extension cords pose another major risk. Compressors draw high initial amperage upon startup. Cheap extension cords overheat quickly under this load. They simply cannot handle the continuous voltage draw of commercial-grade cooling equipment. Plug your machine directly into a wall-mounted GFCI receptacle. This follows basic National Electrical Code standards for wet environments. Always create a "drip loop" in your power cord. A drip loop forces any rogue water droplets to fall to the floor rather than sliding down the cable directly into the electrical socket.
Hardware Inventory Checklist
Review your components thoroughly before starting your cold plunge setup. Missing parts delay the process and tempt you to use substandard substitute materials.
Primary chiller unit (sized appropriately for your tub volume)
External or internal water pump (matching the required flow rate)
Particulate inline filter housing and clean cartridges
Insulated PVC, braided nylon, or thick silicone hoses
Heavy-duty stainless steel hose clamps
Teflon thread tape (PTFE)
Standardized brass or heavy-duty PVC fittings
Spare rubber O-rings sized accurately for your joints
Understanding Water Circulation: The "Inlet" vs. "Outlet" Rule
Plumbing your system incorrectly guarantees hardware failure. You must grasp the basic fluid dynamics of a closed-loop system before connecting any hoses. Understanding these principles improves your overall cooling efficiency and extends the lifespan of your internal components.
The Physics of the Loop
Your system relies entirely on a continuous, pressurized loop. Proper water circulation dictates how fast your tub reaches freezing temperatures. You must always position the external pump to push water through the heat exchanger. The chilling machine should never pull water into itself. Standard magnetic drive pumps excel at generating pushing pressure. Pulling liquid over long distances creates a severe vacuum effect inside the lines. This vacuum causes a destructive phenomenon known as cavitation. Cavitation occurs when tiny air bubbles rapidly form and collapse, creating micro-shockwaves. These shockwaves pit and destroy the plastic impeller within days. Always push liquid into the cooling unit.
Mapping the Sequence
You must map your exact physical route before cutting any hoses. A visual roadmap prevents confusion once you have tools in your hands. Review the standard sequence chart below.
Standard Plumbing Route Sequence
Sequence Step | Hardware Component | Primary Action & Flow Direction |
|---|---|---|
1 | Tub Outlet Port | Releases water outward to the pump inlet |
2 | External Pump | Pressurizes liquid and pushes it to the filter |
3 | Inline Particulate Filter | Removes debris before water enters the chiller |
4 | Chiller Inlet Port | Receives filtered liquid into the heat exchanger |
5 | Chiller Outlet Port | Discharges freezing liquid back to the tub inlet |
Identifying Ports
Hardware manufacturers mark their equipment differently. You must locate and verify the directional arrows on your specific unit. Look closely at the metal or plastic casing near the connection points. You will typically see "IN" and "OUT" stamps directly molded into the plastic. Connecting these backward reverses the flow. Flow reversal forces water against the internal temperature sensors incorrectly. This causes wildly inaccurate temperature readings. The machine will think the liquid is already freezing and trigger an automatic shutdown. Check every single port twice before tightening any hose clamps.
Step-by-Step Installation: Executing the Pump Connection
Execution requires patience and attention to detail. Rushing through the plumbing phase guarantees tiny leaks. These micro-leaks compound over time and ruin surrounding flooring. Follow these exact steps to achieve a perfectly sealed, professional-grade loop.
Step 1: Hose Preparation and Routing
Measure your distance carefully. You want your hose runs as short and straight as possible. Excessively long hoses force the internal motor to work significantly harder. Long runs increase internal friction loss. Sharp bends create severe bottlenecks. Bottlenecks slow the flow rate and reduce your cooling power. Cut your tubing cleanly using sharp PVC cutters or heavy-duty shears. Ragged, uneven edges create weak points inside the clamps. Water easily escapes through these jagged gaps under high pressure.
Step 2: Securing the Fittings
Proper sealing prevents frustrating micro-leaks. Apply Teflon tape directly to all male threads before assembly. Wrap the tape clockwise three to four full times. Wrapping clockwise ensures the tape tightens naturally as you screw the fitting inward. If you wrap counterclockwise, the tape simply unravels and causes immediate leaks. Seat your rubber O-rings completely flat inside the connection grooves. A pinched or twisted O-ring guarantees a slow drip. Focus carefully on your pump connection. You must secure it firmly without crushing the plastic housing. We strongly warn against overtightening. Using heavy wrenches on plastic threads causes invisible hairline fractures. These tiny fractures expand under pressure and burst days later. Use the standard "hand-tight plus a quarter turn" rule for all plastic components.
Step 3: Integrating the Filter
Your inline filter plays a vital role in machine longevity. You must place the filter housing precisely before the primary inlet. Human bodies shed thousands of dead skin cells, natural oils, and loose hair during cold exposure. If these biological materials bypass the filter, they enter the delicate heat exchanger. The exchanger features tiny, intricate micro-channels designed for maximum thermal transfer. Debris clogs these tight channels rapidly. A clogged unit runs constantly but completely fails to cool the water. Proper filter placement prevents this fouling entirely. A well-planned installation always prioritizes hardware protection above everything else. Ensure the filter housing remains easily accessible for weekly cartridge changes.
Priming the System: Critical Steps Before Powering On
Powering your equipment prematurely causes catastrophic internal damage. You must introduce liquid into the dry lines before flipping any electrical switches. This vital process is known as priming.
The Danger of Dry Running
You must never run a mechanical pump without water inside the primary housing. Air trapped in the plumbing creates a stubborn "airlock". Airlocks act like invisible walls. They prevent water from moving forward. Powering on an unprimed pump causes immediate, often irreversible damage. The internal impeller spins at exceptionally high speeds. Without water providing essential lubrication and cooling, the internal plastic friction builds rapidly. The components literally melt together within minutes. This dry running phenomenon remains the absolute leading cause of premature hardware death. You must manually purge the air first.
Gravity Feeding the Pump
Gravity provides the safest, most reliable way to prime your lines. Follow these steps methodically:
Verify the main electrical power cord remains completely unplugged from the wall.
Open the main outlet valve located on the bottom of your tub.
Allow gravity to push the standing liquid down into the primary inlet hose.
Watch the clear or translucent tubing carefully as water fills the dry cavity.
Wait patiently until all large air bubbles stop surfacing inside the tub.
Gravity feeding forces the trapped air up and out of the lines naturally. It requires no special tools and prevents mechanical dry runs entirely.
The Bleed Valve Method
Some premium systems feature a dedicated pressure release valve. You can use this mechanism to purge stubborn, hidden air pockets. Locate the small bleed screw positioned on top of the pump housing. Slowly twist it counterclockwise using your fingers. You will hear a distinct, soft hissing sound. This sound confirms the trapped air is escaping the chamber. Once solid water begins weeping steadily from the screw threads, close it tightly. Wipe away any excess moisture. Your system is now primed and ready for live power. Protect your Ice Bath Chiller by verifying positive flow before ever activating the main compressor switch.
Evaluation and Initial Leak Testing Protocol
You must test your handiwork before trusting the system unsupervised. A proper testing protocol separates reliable setups from dangerous, leak-prone messes. Take your time during this final evaluation phase.
The 15-Minute Dry Test
Do not engage the heavy compressor yet. Run only the water pump independently for fifteen continuous minutes. This acts as a critical dry test. Grab a bright flashlight and inspect every single joint systematically. Run your bare fingers under every threaded connection and hose clamp. Water beads often hide underneath the fittings where shadows fall. A tactile check reveals tiny micro-leaks far better than a basic visual check. If you feel moisture, power down the entire system immediately. Release the line pressure, then tighten the offending clamp or reseat the rubber O-ring.
Insulation Verification
Cold plunge hoses experience severe, rapid temperature drops. Ambient room air naturally contains humidity. When warm, humid air hits freezing external hoses, heavy condensation forms instantly. This condensation drips heavily onto the floor and perfectly mimics a plumbing leak. We highly recommend wrapping all exposed tubing in thick neoprene or heavy foam insulation. Insulation stops external condensation completely. It also prevents ambient room heat from warming your chilled water as it travels. This dramatically keeps your monthly energy bills low and reduces compressor wear.
Shortlisting Setup Success
You need a clear baseline to measure your ultimate success. A perfect setup operates quietly, smoothly, and efficiently. You should see a steady, forceful stream of water entering the tub. You should hear absolutely zero rattling, grinding, or gravel-like cavitation noise from the motor housing. All floor areas around the fittings must remain bone dry. Once you finally activate the main compressor, watch the digital display. A steady, consistent temperature drop confirms your heat exchanger is working perfectly.
Conclusion
A reliable, freezing tub depends entirely on your initial plumbing and electrical diligence. Careful assembly prevents catastrophic leaks and dangerous electrical faults. Correctly routing your water extends the lifespan of your expensive equipment and guarantees optimal cooling power. It also drastically reduces your monthly energy consumption by preventing thermal loss. Never rush the sealing or priming phases. Consult your specific manufacturer manual next. Check their guidelines for ideal temperature settings and exact filter replacement schedules. Consistent maintenance guarantees years of safe, reliable cold exposure. Take pride in your secure, meticulously planned installation.
FAQ
Q: Why is my ice bath chiller running but not cooling the water?
A: Your system likely has an airlock blocking the flow. Poor ventilation also causes the compressor to overheat and shut down automatically. Check your plumbing lines to ensure you did not reverse the flow direction. Water must always enter the inlet port and exit the outlet port. Verify your clearance space allows proper exhaust heat escape.
Q: Do I need a separate pump for my chiller?
A: It depends on your specific model. Some premium units feature built-in internal pumps. However, many standard units require an external inline pump to push the liquid through the heat exchanger. Always check your hardware specifications before purchasing accessories.
Q: How tight should the hose clamps and fittings be?
A: Use the "hand-tight plus a quarter turn" rule for all plastic fittings. Overtightening crushes the rubber O-rings and causes hairline fractures in the plastic threads. For stainless steel hose clamps, tighten them until the rubber hose slightly bulges through the metal slots, but do not cut into the hose.
Q: Is it normal for the chiller to produce heat?
A: Yes. Chillers operate via thermal exchange. They remove heat from your tub water and exhaust it into the surrounding air. Hot exhaust air blowing from the fan indicates the internal compressor and condenser coils are working correctly to cool your water.